Wednesday, December 14, 2011

The Blue Blazer

We've had a pretty mild winter this year for Canada. Usually by this time, it's in the negative teens and we've got a few feet of snow. Today, it rained. That took away the small amount of snow we had left! It's kind of upsetting, being only a few weeks until Christmas, but the positive to it, is that I can wear heels for a little bit longer!

A few weeks ago, a friend invited myself and Riley to a magic show in Toronto. Generally, when things like this occur in my life (a.k.a I get to actually do things, which I know weeks in advance) I start to hum and haw over what I might want to wear. This I hadn't thought to much into, until I found this amazing electric blue blazer at H&M. I decided, after purchasing it, that that would be part of my magic show outfit.
When I got into the car, I said to Riley, 'I want to look like a magician as much as possible.'

The Outfit


Blazer: H&M
Leather Pants: H&M
Necklace: Forever21
Bracelet: Vintage
Shoes: Aldo


Rebekah Eden.


Wednesday, November 30, 2011

Mid-Winter Night's Dream

I apologize for the lack of update, for the past month I was participating in National Novel Writing Month, so it took up a lot of time. But I'm back with a vengeance -- and outfits! I made some of these over the month, and I apologize for any missing links. 


The cold weather has just recently started to settle in for the long run here and Canada, so I decided I would take that into account for this post. Many people have their own personal styles when it comes to everyday winter fashion, but many people don't think about night out fashion. Going out in the winter is sometimes one of the only things that keeps you smiling in the crappy weather, and it definitely helps to look good while doing it.

I'm a firm believer that the one thing you have to think most about in the winter is your coats. Here in Canada, you have to have a good selection, because wearing the same black jacket every day in the winter can get old fast. It's worth the money if you live in cold weather to invest in a few different winter coats over the years, generally timeless coats that will be good for many years.

Your winter coat is important for many reasons, beyond just the warmth. Whether you're planning on walking around outside for hours, or just taking the jacket off as soon as you walk into the restaurant, your coat is the first thing people will notice about you. And you don't want a beautiful outfit ruined by some old, ratty ski-jacket.


No matter where you're going out with friends, remember that you don't have to skimp on looking good just because their is some snow on the ground!

Polar & Posh


Hip & Heated


Pretty in Plaid


Hopefully these help to inspire you for your winter outfits. Remember that you don't have to compromise no matter the temperature outside! Warm up that grey sky with some bright and fun styles!

I hope to be updating a little more as well. Stay tuned!

Rebekah Eden.

Monday, October 24, 2011

1920's Halloween

Halloween is just around the corner, and after some humming and hawing over what I was going to be, my good friend, Riley, suggested I be a flapper; no doubt after one of our favourite shows, Boardwalk Empire. No matter why she suggested it, I immediately warmed to the idea. 

You see, I've never been a huge fan of Halloween. When I was a kid, I didn't really like sweets, and now, as a grown up, my issues are more with the costumes. I can enjoy dressing up, escaping your own skin for a little while, but, as a young woman, there are not very many options (it seems) that aren't insanely sexy. Which, don't get me wrong, aren't bad in some cases. But I'm not the type who wants to walk down the street looking like that. 

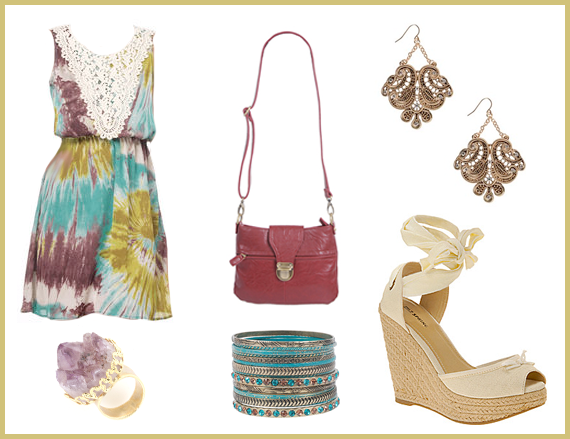
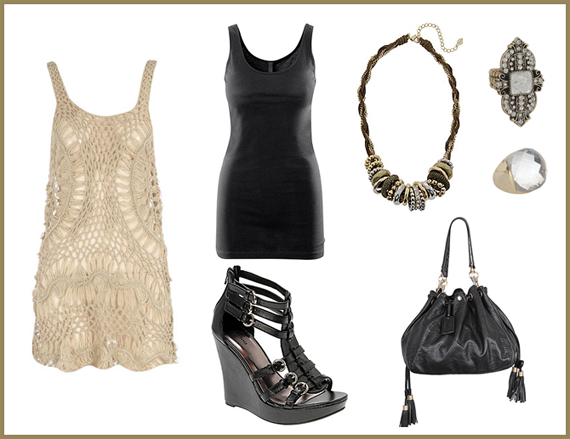
So I stayed on a flapper. It's fun, comfortable, easy to find and a lot of option! This post is a tutorial about make-up, not the costume. However, just because this IS a fashion blog, I did make a little collage of an outfit that would be great for a 1920's look, that isn't too expensive.


(This is actually a great costume right now -- 1920's is a trend this coming spring, so you might find a lot of options in store!) 

Anyway, what I really got excited about when I thought about being a flapper for Halloween, funnily enough, was the make-up! 1920s make up is so dramatic and dark, something that you definitely can't do every day. Because it takes a steady hand, I decided to do a few practice rounds in the last couple of weeks, just so that the night of, I knew what I was doing. The last time I did it, I took step by step pictures so that I could post it here. 

Please keep in mind, I'm not a make-up artist. I'm not even close. I've had no professional training and all the stuff I'm using can be found at any drug/department store (save for one item I found at a costume shop, but you can use a pressed powder or just your eyeliner in the same way). 

Here is a list of things you're going to need, many you will probably already have: 

- Foundation/primer
- Make-up sponges
- Small angle brush
- Black eyeliner
- Oil based make up (I chose Graftobian Creme Liner in Black)
- Dark red lipstick
- Red lipliner (optional)
- Setting Powder (optional)

The steps aren't really hard to follow, it's more about the angles and being careful with your hand! You might want to try this once or twice before the real thing, as I did. 

The Before 
(scroll down to the end of the post for the after!)

WARNING: THE NEXT PHOTOS INVOLVE A WIG CAP. YOU MAY LAUGH. IT'S OKAY, I'LL NEVER KNOW.

Step 1: The Base

The first step is one of the easiest by far! Begin with your regular foundation and put a generous amount over your entire face. I find by putting it on my eyelids and over my eyelids/lips, it makes my make-up stick better.

Generally, flappers were extremely pale. So if you're already pale, like I am, you'll probably be good with what foundation you already use. If you have darker skin tones, it's not a problem! Don't try to go for a super pale face with the rest of your skin being darker, I think this make-up will look beautiful and dramatic on any skin tone!


Note: I have rosy cheeks naturally. If you tend to have to wear blush, you can also apply a light amount to the apple of your cheeks if you prefer the look! 


Step 2: The Eyeliner

This step is also pretty easy. Take the black eyeliner, and apply it generously entirely around your eye. I use Rimmel's Exaggerate Automatic Waterproof Eye Definer in black (it's the twist version, with the sponge at the other end). If you have liquid eyeliner, you might want to use this instead, because after this eyeliner, I apply, using the angle brush, that cream eye liner for a darker look! 


The first picture is with the Rimmel eyeliner, the second is using the Graftobian. You can see the difference!
Step 3: The Eyelids

This is where the angles and the detail comes in a little more. There are a few options when using this step. I chose to use the Graftobian & angle brush, smudging with the end of my Rimmel eyeliner. You can choose to use pressed powder and a brush OR your regular black eyeliner and a make-up sponge--Play around with it, find what works best for you! Just remember, you want it dark and dramatic.

Using whatever items work for you, you want to start applying to your eyelids. You want to emphasize in specifically two places: the crease of your eye, and the deep inner section under your eyebrow (see below for what I mean!) You still want to apply a smaller amount to the eyelid itself, but you want it to be much darker in these two areas.


You also want to take care with the space between the crease angle you create, and your eyebrow. You want to leave this untouched by the black, because later it will make your look more dramatic. You can choose to add a light highlight there if you'd like!


Here is the finished lid look from the front. When applying to the inner eye, feel free to go up onto the bridge of your nose now, this will help when doing your brows later.

Step 4: The Beginnings of the Brows

Back to another quick an easy step! Using the angle brush and cream liner, or just your regular liner (the sharper the better at this point) you want to start shaping your brows. You can be a bit messy at this point, you're going to soften them up! You don't want too much of an angle in the brows, but you don't want them straight. I find it's easiest to just follow your natural eyebrow shape.

Note: I'm going for an early 1920's look. In the early 20's, women would thicken their brows for more expression and drama. Nearer to the 30's, they were much thinner. I find the thicker brows are a lot easier than trying to achieve the pencil-thin brows.


Step 5: The Finished Brows

I made these two steps, because it's a bit easier to break up! Now, using the thicker shape you've made, you want to go in with your smudge stick (or make up sponge, your choice!) and begin to soften the lines. If you're unhappy with the shape, keep working until you're happy with them. I prefer making the thicker part of my brow almost completely straight (as in completely horizontal) then, in the natural bend of my brows, I begin to follow that. You don't want to have any sharp angles, you want them as soft as possible.


Once you're happy with the size and shape, take a sharp eyeliner, or your angle brush, and extend your brow about an inch or two past your eye using the same angle you have going already (thats why you don't want too harsh of an angle, or the extension will be going down onto your cheek!) This is another key part of the 1920's look.


Congratulations! Your eyes are done!

Step 6: The Lipliner (optional) 

You're almost finished now!

The lipliner is only optional if you don't really care about the shape of your lipstick. If you just want to follow your natural lips, go for it! I also find, with a dark red, it really helps you not mess up haha! I don't change the shape of my lips that much, but I do like the fact it helps me get a clean lip look.


I begin with making three dots on my upper lip, the two peaks and my cupids bow. Then I draw a soft line at the bottom of my bottom lip. From there, you just connect the dots. 

Step 7: Finalize the Lips

This is the easiest step if you've ever applied lipstick before, haha! You literally just put the lipstick on your lips. I chose Rimmel's Moisture Renew, in Burgandy Delight. It's a beautiful deep red, I love it! 


Step 8: Setting Powder (Optional)

The setting powder is completely optional. I only recommend this if you're planning on going out dancing or partying like a crazy person! It's colourless powder that you put over your make up and it will stop it from smudging! If you're just going to a relaxing party, you probably will not need this, it's only for those party animals!

The After (with wig!)


Hope you enjoyed my very first make up tutorial -- HAPPY HALLOWEEN!


-- Rebekah Eden.

Saturday, July 16, 2011

Cowboys & Indians

About a week and a half ago I got myself two new tattoos to by growing collection. My best friend, Riley, came to keep me company while I went under the needle. To my surprise, she showed up in a pair of cowboy boots she had gotten from her trip from Texas about 6 months ago. She had on a pair of jean shorts, a white t-shirt with a small amount of floral embellishment, and a bright scarf. I thought this was a great representation of the newest cowboy craze without using too much of the dull colours which you usually see.

Another great thing we had discussed ever since seeing them at H&M, are ponchos. They are something I thought I would never wear ever. Ever. But the more I see them  at the store, the more I find myself liking them! Riley has sworn that the moment it's on sale, it will be her's. I support this decision.

So when I came to think about what my next blog post would be about, I thought of Riley, and new that she would be the inspiration for this post. Here are some cowgirl-esque outfits inspired by her!


The Poncho


Country Meets City


Psychedelic Cowgirl


Thank you Riley for the touch of country fun! 

Enjoy~

Rebekah Eden.

Monday, June 27, 2011

Punk Rock

One trend I have always been fond of since my days of wearing too much black has been adding a touch (or a ton) of punk to an outfit. I was pleasantly surprised when this Spring/Summer trend popped up. I've always been a big fan of Balmain since I found them. They've always been a little rock and roll, but this season they added a lot of punk to their collection, along with many other designers.

The best piece of punk that everyone can rock, in my opinion, is a leather studded jacket. These things are probably one of the best investments you can make. Personally leather is too expensive, but even leatherette can be just as good of an investment in your wardrobe. Studded jackets can last a very long time, and the nice thing is if they get roughed up, they still look good. It gives them character. Other great reasons to get one (or two!) of these jackets are that they're rain proof, and you can layer them to wear them in a lot of different weather; and, depending on the colour, they match pretty much anything. You can throw it on and rock it anytime!

Many of my favourite people in the fashion world have always embraced this trend, wearing it in so many different ways. Two of my favourite models (and icons), Freja Beha and Daisy Lowe, both know how to wear a studded jacket.

For Freja, it's almost an every day thing. She dresses simply, but shows how a leather jacket can add a bit of punk flare to a pair of jeans.

Photo: The Fashion Spot

Daisy wears her studded jacket quite often as well, but she loves to pair her's with a flowery dress.


Photo: The Fashion Spot

So enough about how everyone else wears these amazing jackets--the question is, how can you wear them? And the better question is, how can we afford them?

Leather jackets can be expensive, adding studs make them even more money. If you have the funds, my suggestion is to invest in one that is not overly expensive but more than what you might spend on a jacket. However, that's not why I'm here. I'm not here to tell you to spend a lot of money. To be honest, I might not even take that advice because I'm indecisive about what I wear. I would rather get a few different leatherette, suede or denim jackets for the same price as one and have more choices.

I was able to find a few cheap options for those of you who may not have the funds to afford something that's upwards of $200-300.


(From top left to bottom right) Studded TrenchMoto JacketLeatherette Jacket

All the jackets above are about $100 or less, which I think is pretty acceptable for leatherette jackets. Here are some tips from finding your perfect inexpensive leather jacket: 
  1. Check thrift stores first.
    I know what you're thinking: Why is this first on the list? Well, I'm a HUGE believer in thrift stores and always have been. Once you get past the fast someone else has worn the clothing, you are left with some really amazing or interesting pieces you might not be able to find for ages. I say check here for leather jackets first because you will most likely be able to find a few interesting choices (colours, leather types, styles) without spending very much money. Another plus is leather jackets generally look better after being worn. By going straight to the used jackets, you get that worn character right away!

  2. Shop around.
    Don't go with the first jacket you see just because it's a good price or looks good. Leather jackets go in and out of style (especially in the fall) so make sure to check many different stores so you can find your best fit and price.

  3. Buy the right size.
    The right size for leather(ette) jackets is something that you will be able to fit a sweater under, or at least that's what I believe. Leather can be worn almost all year round if you can put a warm sweater underneath. Personally, I think something is a better bargain when I can get more use out of it. However, if you have to go a bit too big, or snug, go with snug. Leather, or faux leather, tends to stretch a little after a few wears, so too big might become way too big after a couple of times wearing it.

  4. Buy one that fits your style
    I know, I know, this whole thing is about trying these out and I know these don't fit into everyone's style easily. All I mean is if you're going to try it, try to make it match your personal style as best as possible. For instance, if you're a more comfortable, relaxed person, stick with something neutral and perhaps without studs. On the other hand, if you're a wild child who will wear anything under the sun, go for something with more character (or buy a few in cool colours) so that it fits. I say this because if it matches your wardrobe, you get more use out of it.

That's it that's all--Let's get to the fun stuff.


Finally, here is a few ways I would wear these kick-ass studded jackets.


City Studs


Leather & Lace


Wild Ride

(Both the ring and the earrings I believe are from Forever21, but no longer in stock)


So I've hope you've enjoyed my little detour through punk-rock village. I really hope this inspires you to rock a nice leather studded jacket on a cold summers night and then carry on the trend year round! It's a great way to bring a little edge to any outfit, so don't be afraid to give it a shot.

Rebekah Eden.

Wednesday, June 8, 2011

Tie Dye Time

Recently I've been noticing a less obvious trend this season that is especially happening in the less expensive places where I look on a daily basis. It's something that in the past I wasn't overly fond of, but the more I see it, the more I'm beginning to dig it.

If the title didn't give it away, the trend is: Tie Dye!

A few years ago, if you were to ask me about my take on tie dye, I would say the only thing that goes with it is a ripped up pair of converse, head bandanna and a lack of the desire to get a job. But more and more, I see tie dye in beautiful colours (other than rainbow) and designs that aren't the norm. The more I see of these new colours, designs on things that aren't necessarily on a $5 t-shirt, the more I really like it. So I thought I'd try and go out on a limb and make some outfits which focus on the fun of tie dye pieces.

Casual Vibes


Shirt, Shorts, Hat, Sandals, Necklace, Purse, Ring


C'est couleur.


Skirt, Shoes, T-Shirt, Hat, Purse, Belt


Feminine Splash


Dress, Purse, Shoes, Bracelet, Earrings, Ring

So there you have it: three different tie-dye pieces in three different styles. Everything from the more usual casual hippie style with big beaded necklaces, to a bright feminine touch. 
 
Tie dye is an interesting print, but like all prints it has it's misconceptions. Many people have this belief about a lot of prints, especially stripes, polka dots and other common patterns, that make it out into the public and everyone shies away from them. I admit that I've given into these more than once, but I'm trying to open my eyes to them. Although tie dye might still be seen as something that should have stayed in the 1960's, I think it's gone through a wonderful reinvention! The only thing true about tie dye is that you have to have fun with it. It's definitely not something you take seriously!


Rebekah Eden.


P.S. I apologize the specific links to Spring aren't working currently. I will update with the direct links as soon as the site is working again.

Tuesday, May 31, 2011

One Sunny Day

For the first time in over a week we have no rain. We have 27°C heat. We have sun.

I have been awaiting this day since the rain began. Well, really, I've been awaiting this day since I bought a sun hat. It's always my luck that when I buy a new item of clothing that is usually worn in a certain type of weather, that weather doesn't arise for a very long time. For instance, I'll buy a new winter coat and it'll be warm for the next 4 weeks. In this case, I bought a sunhat from H&M, and it rained for almost 2 weeks straight. A few days ago I got a new pair of cork wedge sandals from Spring. Still raining. And then this weekend I got a beautiful dress, again from H&M, that I intend to wear for my convocation, but it's still a sundress! Still. More. Rain.

So today I awoke to beams of light coming through my window, and I sat up wondering what this beautiful light might be. It was sun. Sun! I was instantly delighted and knew exactly what I wanted to wear today. I'd only been waiting forever for the chance to wear it.


Sunshine. Please stick around. I love you!

Rebekah Eden

Thursday, May 26, 2011

Contrasting Palettes

Something I'm really enjoying about this summers trends is that people are becoming less afraid of bright colours. In the past, bright colours, especially a few at once, were worn by the bold. Now colour blocking and mixing a bright palette of colours is the new hip thing and I love it!

So I decided to take these colours one step further. Why not pair contrasting colours? They look fantastic together and can give any outfit a punch of artsy flare. The following outfits show these colours in a dramatic way, but pair contrasting colours with neutrals, and they look just as wonderful!

Orange & Blue


Dress, Heels, Clutch, Earrings, Ring, Bracelet


Coral &Aqua


Shirt, Shrug, Skirt, Sandals, Necklace, Purse


Purple & Yellow


Romper, Sandals, Purse, Headband, Necklace, Bracelet


Remember this summer to try and take some black out of your regular wear. In stead of matching a yellow shirt with a pair of jeans, try a purple skirt. Got a favourite blue dress? Pair it with orange! It's fun to try and mix colours without using neutrals. The summer is probably the best time to show your colours, so let the world see them!

Rebekah Eden.

Monday, May 23, 2011

Casting on to Summer Knits

I'm back from a short hiatus, and I thought that for a good first summer post I would cover something that I enjoy doing and wearing: knits and crochets! I'm not a very experienced knitter, even less so of a crocheter, but I enjoy what I can do. Most of all, I enjoy wearing knits. But the one thing about knitting is it has the connotation of being a winter weather choice. If you had asked me a year ago, I probably would've agreed with you. 

Although a lot of knitting is done with thick, comfortable wool yarn, there is cotton yarn that can be used to create pieces as well. Crochet is a little more summer friendly. Cotton yarn and crochet go great together and crochet has the chance to be breezy but fashionable. I decided that I would showcase a few outfits that have summer-friendly knit/crochet pieces in them. 


Playful Patterns


Daring & Dressy


Knitty Gritty


So there are a few styles to inspire you to give summer knits a try! They are a great way to add some texture to an outfit without too much thought. There are many other ways to wear them so find a knit you love and introduce it to your wardrobe this summer!


Rebekah Eden.


Saturday, March 19, 2011

The Fabric Store

Today my roommates and I went to a Fabric Store so one of them could get fabric samples for a final project. During the visit, my friend decided to snap a few pictures of my outfit for the day.


Today was a particularly nice day. Canada is starting to get warmer, so I was lucky enough to wear my H&M trench coat, which I love. It has a hood which has come in handy many times. The satchel was given to me by my roommate, Riley, after her trip to California. This was a Target find, so it wasn't overly expensive. I love when nice things are cheap!

I'm also wearing a pair of H&M jeans I picked up for 12.95! Sometimes they have these random skinny jeans on for cheap. Mind you, the last pair I picked up were defective (the in seam is twisted) these ones are perfect. I love them. Lastly, my wedges that will always be my favourite heels. They're insanely comfortable and fun to wear.

I never used to be much for wearing heels on a daily basis, out for any occasion, but those wedges make wearing pumps out a dream. I look forward to wearing them as many times as I can. I hope every girl gets a pair of heels like that, because wearing heels out in public always makes me feel a little more put together and little more feminine (even if I'm wearing a military style jacket.)

Anyways, that's my update for now, I hope you enjoy.

Rebekah Eden.

Wednesday, March 2, 2011

The Maxi Dress

There are many styles that I have grown to love over the last few months that I would have stayed away from in the past. The maxi dress is one of them. It's very curious to me how such beautiful dresses are always overlooked. Girls walk over to one, look at it, touch and feel it, but never take it off the rack because they think: I could never wear that. But what's the issue?

For me, it was always height. I'm a happy 5'6", which is pretty average for most of the female population. However, this puts me a few inches shorter than those tall, thin woman you often see looking fabulous in a maxi dress. I never tried them on because I thought that if I wore one, I would look considerably more short than I am. I may be happy with being 5'6", but I certainly didn't want to appear to be much shorter than that.

A while ago, I took a leap of faith and tried on a maxi dress, and, to my surprise, I loved it. The dress really did the opposite than I thought it would. I looked taller and thinner than I ever would have guessed. From the point on, I was in love.

Here are a few ways to wear a few different types of maxi dresses.

Casually Au Courant


Flirtatious Lass


Elegance & Sophistication


I hope some of these styles make you rethink a maxi dress and try one on at least. They look great on a lot of different body types, and choosing the right one can tailor perfectly to your needs. So give a few a chance, you may fall in love if you take the chance.

Rebekah Eden.